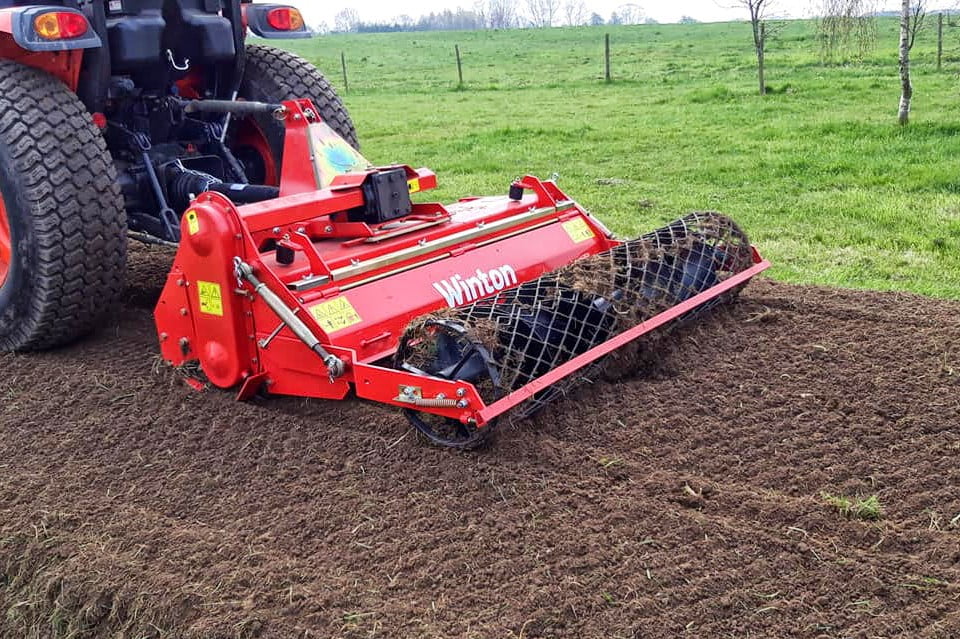
The Winton Stone Burier is ideal for preparing stony soil for cultivation with minimum effort. It is important to know how to adjust and maintain this machine to get the best results. Both the tractor and machine should be stationary, as well as the keys out of the ignition before starting any repairs or maintenance.
Attaching the Machine
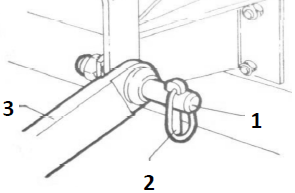
- Start by finding a flat piece of ground. Position your tractor and lower the 3-point linkage (3) to line up with the machine.
- Then attach the machine to the tractor using the 3-point linkage pins (1) and fix into place with the linch pins (2).
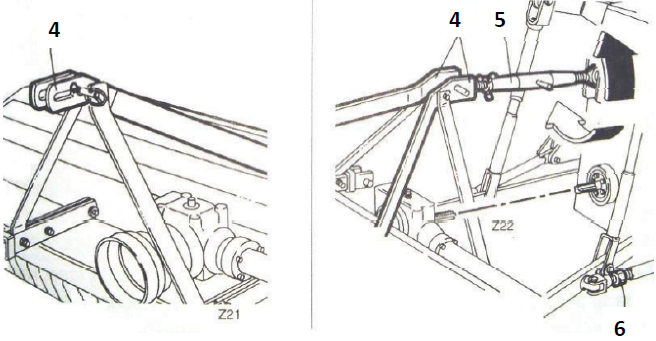
- Adjust the top linkage arm on the tractor (5) until the PTO of the implement is parallel to the ground.
- Start the tractor engine and lift the machine from the ground, then turn off the tractor engine and remove the ignition key.
- Level the machine so that both sides are parallel to the ground by adjusting the tractor’s lifting arms. The blades must be at the same distance from the ground on both sides of the implement.
- Adjust the tractor lower link arm adjusters (6) to prevent any excessive movement to the side. A movement of about 50mm each side (2 inches) is recommended.
- Attach the PTO driveline checking that it correctly meshes at both ends. If a shear bolt or slip clutch safety system is used on the PTO shaft this must be mounted on the implement end. Check that the PTO driveline is the correct length. The minimum overlap must be 180mm (6 inches) when working and the driveline must be able to travel at least 25mm (1 inch). Always couple the two ends of the driveline and check they are locked in place.
- Completely insert the sprung lock pins 1 into the grooves in the PTO shaft on both the tractor and machine sides. Check your PTO shaft’s grease points and apply grease if needed.
- Attach the PTO drive shaft and ensure the locking pin is secure on both the tractor and mower sides.
- Attach the chain to a secure point on the tractor/implement. Operate the machine with the tractor in low range gear and the PTO delivering 540 RPM.
Changing the Blades
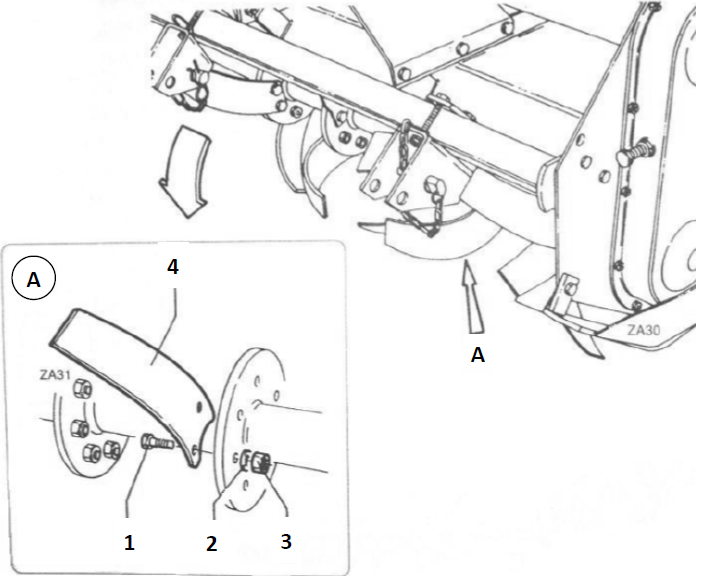
Sufficiently lift the machine so that the blades and rotor can be accessed easily. Always support the machine on rigid supports and ensure it is stable before carrying out any work. Take care to ensure that the new blades are mounted in the same position as the old ones and ensure the sharp side of the blades point in the same direction as the rotor turns:
- Remove the blades by unscrewing bolts (1) and nuts (3).
- Insert the blade/s (4).
- Replace bolts (1) and nuts (3). Ensure bolt head is on the blade side.
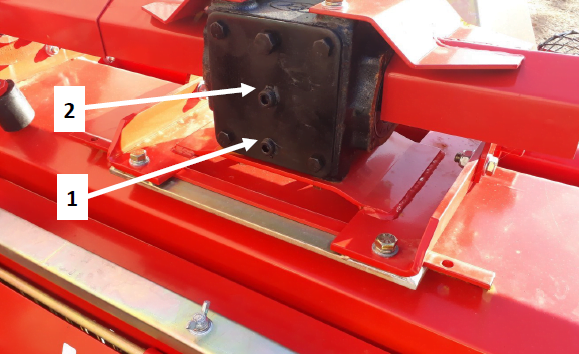
Gearbox Oil Check/Change
Do not mix old and new oils together or mix different types of oil. Always dispose of old oils safely and in the correct manner. Always make sure the machine is on a flat and level surface when checking oil levels. The machine should be left at a standstill to cool down for at least 10 minutes. Ensure the machine is stable before carrying out work and will not upturn.
- Remove plugs (1 & 2).
- The oil level should be up to the edge of level plug (1).
- Top up with oil (80w90 gear oil) if required using filler hole (2).
- Replace both plugs (1 & 2).
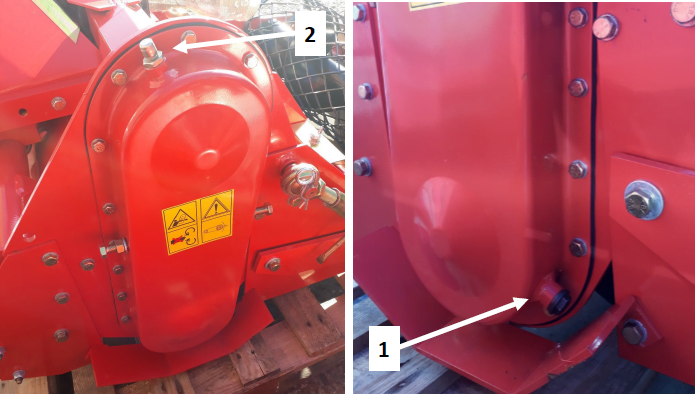
Chain Reservoir Oil Check/Change
- Remove level plug (1) and wind out breather (2).
- Check the oil reaches the edge of level plug (1).
- Top up with oil (SAE 140 gear oil) if required using filler hole (2).
- Replace both plugs (1) and breather (2).
If an oil change is required, start by removing the old oil using an oil pump. Then replace this with new oil using the steps above.

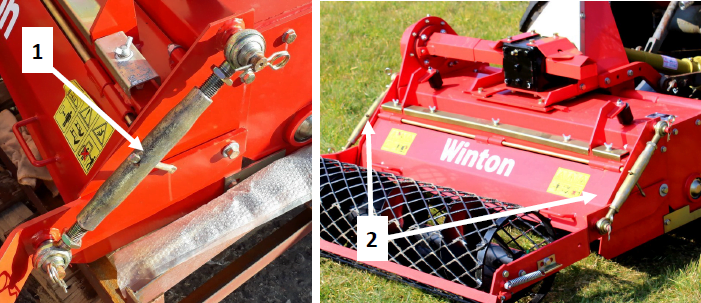
Adjusting Chain Tension
The tension of side transmission chain should be checked and/or adjusted regularly to ensure the machine is working efficiently. It is helpful to have someone assist you on this job, as you will need to spin the rotor and tighten the tensioner bolt at the same time, and this can be tricky alone.
- Slacken off nut (1) on the chain tensioner a few turns.
- Tighten the chain tensioner bolt (2) by hand as far as possible.
- Ask an assistant or use your other hand to turn the blade rotor.
- When the maximum tension is achieved by hand, unscrew tensioner bolt (2) by one turn.
- Keep it in this position by tightening lock nut (1).
After setting the tension, turn the blade rotor several times by hand to check that it rotates without encountering any excessive resistance. If the rotor seems to jam in a certain point, repeat the chain tensioning procedure from the beginning.
Adjusting Tilling Depth
Getting the set-up of your machine correct is the key to creating the best finish when cultivating. It is always best to take several trial runs, to get the set up correct, before tackling a larger area. The initial set up of the tractor’s top linkage arm and the linkage set up will influence tilling. But it is key to set the rear roller to get the correct depth when cultivating.
- Use the bar (1) to twist both of the adjusters (2) (similar to tractor top linkage arms) to extend or shorten the arms.
- Extending the arms will create a shallower tilling depth. Shorten the arms to lift the rear roller and achieve the maximum working depth.
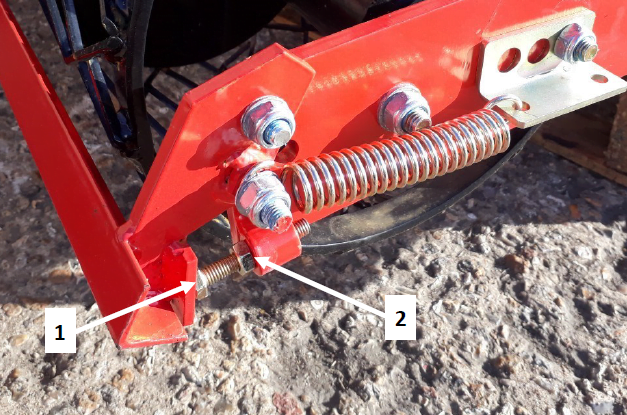
Adjusting Roller Scraper Bar
The scraper bar is designed to clear any excess soil from the mesh roller. It is important to correctly adjust the scraper bar to ensure there isn’t a build-up of material when working.
- On both sides of the mesh roller bracket loosen off nuts (2).
- Adjust bolts (1) as required.
- Retighten nuts (2).
Adjust both bolts and check the clearance from the scraper bar to the roller is the same at both ends to ensure the bar works efficiently. Winding the bolts in moves the scraper bar closer to the roller and outwards increases the clearance. If you find the roller is not spinning freely where soil is building up on the roller and not being removed (usually when ground is wet or in certain soil types), then clean off the roller and wind the bolts outwards to move the scraper bar away from the roller.